It's Christmas time and that means Christmas decorating and that means Christmas crafts!
Today, I crafted these pretty, festive tea light holders.

They are a little messy, I have yet to do the final clean up with them, but you get the idea.
It was a multi step process. First I had to cut the glass, then decorate the holders. So let's begin!
1. Collect your materials to cut the glass. You will need boiling water, ice water, a bottle and a glass cutter (I use a G2 Bottle Cutter that seems to be pretty successful).

2. The first thing to do is cut the glass. The key to cutting glass is to make sure your blade is against the glass at the right angle, if it is tilted in any way you are going to have a bad break. You also want to make sure you move the blade around the glass evenly, the same amount of pressure all the way around. Be sure not to go over the same place twice (you will hear the difference between cutting the glass where it has not been cut before and going over the same spot; the more times you cut the same place the more chance of fractures).

3. After making the cut the next step is to separate the glass. What you want to do is submerge the glass into boiling water for 10 seconds (make sure the cut is under water). Immediately take the glass from the boiling water and put it into the ice water. Hold for another 10 seconds than pull the glass from the water, it should separate at this point. If not, continue going from hot water to cold water until it separates. I have found that if it doesn't work after four or five times, you wont be getting an even break no matter what you do.
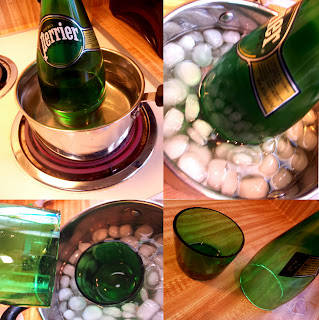
4. Once you have let the glass cool so you can handle it, the fun begins! I wanted to make a polka dot pattern so I used some old stickers that I had to make a pattern on the glass.


Since I used regular acrylic craft paint, I was able to scrape off any paint that was where it wasn't supposed to be.
6. To finish it off, I used Modge Podge to go over the painted areas and covered the white areas with glitter. 
When everything is dry, use a damp cloth to clean the glitter off the glass.
7. Wait for the Modge Podge to dry, and then add another layer of Modge Podge over the glitter to help keep the glitter on the glass and off your hands when you touch them. I made three of these in total, two using the stickers to make polka dots and another using masking tape to create a strip pattern. The possibilities are endless!
Have fun crafting!